It's very common to want to adjust the bounds of
a UILabel to fit its contents. The
most common technique I've seen from developers looks something like
this:
UILabel *label = [[UILabel alloc] initWithFrame:...];
label.text = NSLocalizedString(@"Some long text here...");
label.numberOfLines = 0;

CGSize maxSize = CGSizeMake(label.bounds.size.width, CGFLOAT_MAX);

CGSize textSize = [label.text sizeWithFont:label.font
                         constrainedToSize:maxSize];

label.frame = CGRectMake(10, 10, textSize.width, textSize.height);
This code is using one
of NSString's sizeWithFont:... methods to
calculate the bounds of the label's text, taking its font and width
into consideration.
If you are sizing your labels like this, you need to read on because you are doing it wrong.
A smell
Let's take a step back and think about this for a moment.
We want to know how much space the label needs to display its
text. Surely that logic belongs in UILabel? Only the
label itself really knows how it renders its content and what
offsets or margins it may be applying.
It seems like a bit of a smell to me that we have to calculate this stuff ourselves using methods on another class.
Now in the case of UILabel, it
turns out that -sizeWithFont:
returns exactly the size we need. The label is probably doing a
simple -[NSString drawAtPoint:...]
which matches up perfectly with the results we get back from
the sizeWithFont:... methods. But
is this always going to be true?
What if UILabel decides to add support for special
borders, or configurable line heights, or some other visual effects
that will change the required bounds? The above code is going to
break. It isn't future proof, and we are essentially duplicating or
even worse
guessing the behaviour of UILabel's rendering.
Is UILabel really going to change in such a manner?
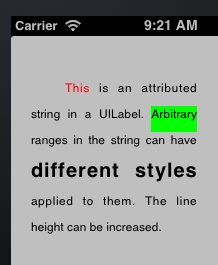
Well, it just did. As of iOS 6, UILabel supports the
rendering of attributed strings. This means arbitrary ranges in the
label's text can have different fonts and styles applied to them. If
there is word in the middle of the label with a very large font,
bounds required to fit that string in the label are going to
increase.
If you use the previous code unmodified on a label containing an attributed string, you are going to get incorrect results.
As it turns out, that there are UIKit additions
to NSAttributedString,
namely boundingRectWithSize:options:context:, which
provide similar functionality
to NSString's -sizeWithFont: methods. But
our code still should not be duplicating this kind of logic,
especially when there is a far better and simpler solution...
sizeToFit
and sizeThatFits:
If we want to resize a label to fit its contents, we can just tell it to do so:
[label sizeToFit];
Bam. Done. The label will take its current width, and adjust its height to fit its contents (assuming it is a multi-line label). If the label has a width of 0, its size is adjusted to fit everything on a single line.
If you wish to size the label without setting a frame beforehand, you can ask the label for the size it needs like this:
CGSize maxSize = CGSizeMake(200.0f, CGFLOAT_MAX);
CGSize requiredSize = [label sizeThatFits:maxSize];
label.frame = CGRectMake(10, 10, size.width, size.height);
Note the use of CGFLOAT_MAX here to
mean "unbounded".
Both sizeToFit and sizeThatFits: are
standard in UIKit and have existed for a very long time. They work
with the new attributed string support in iOS 6, and will continue
to work no matter what changes are made to UILabel.
It pains me to see people writing useless (and often times
incorrect) categories
on UILabel for something as standard as this. I
guess the lesson to take away is to explore as much of the
documentation as you can. I'm sure there are many useful methods out
there that I've overlooked.
Going a little deeper
The documentation
for sizeToFit
and sizeThatFits:
can be found in
the UIView
class reference.
What you need to know is that sizeThatFits: is
overridable and returns the "most appropriate" size for the control
that fits the constraints passed to it. The method can
decide to ignore the constraints if they cannot be met.
sizeToFit will simply call through
to sizeThatFits: passing the view's current size as the
argument. It will then update the view's frame based on the value it
gets back. So all the important logic goes
in sizeThatFits:, and this is the method you should
override for your own custom controls.
A major detour: UIButton insets demystified
Many of the standard UIKit controls
implement sizeThatFits:, one of which
is UIButton. However, things can get a little tricky
with UIButton, especially when when you throw insets
into the mix.
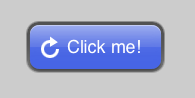
We'll start by creating a button with an image, a stretchable background image, and some text:
UIButton *b = [UIButton buttonWithType:UIButtonTypeCustom];

[b setBackgroundImage:[self buttonBackgroundImage]
             forState:UIControlStateNormal];

[b setImage:[self buttonImage]
   forState:UIControlStateNormal];

[b setTitle:NSLocalizedString(@"Click me!", nil)
   forState:UIControlStateNormal];

[b sizeToFit];
We call sizeToFit and end up with
this:

The button elements are all crammed together with no spacing. This is expected, and to fix this we need to give the button some insets.
UIButton provides
three UIEdgeInsets properties that
you can play with to adjust the spacing of the elements in the
button. These
are contentEdgeInsets, imageEdgeInsets
and titleEdgeInsets.
If you've ever tried adjusting these in Interface Builder, you'll
know things can get a little... interesting. For example, you may
have tried increasing imageEdgeInsets.left 1 point at a
time and seen how the button image seems to move unpredictably,
sometimes making big steps between values:

The reason for this is that a positive inset value will shrink the layout rectangle for the image and give you you unpredictable results as the button tries to fit the image into a bounding box which is too small.
The documentation
for UIEdgeInsets describes what insets represent:
Edge inset values are applied to a rectangle to shrink or expand the area represented by that rectangle. Typically, edge insets are used during view layout to modify the view’s frame. Positive values cause the frame to be inset (or shrunk) by the specified amount. Negative values cause the frame to be outset (or expanded) by the specified amount.
What this means is that if we want to reliably shift the image or text, we must add or subtract equal (but opposite) amounts to both left/right or top/bottom insets.
Confused? I'm not surprised. To help you visualize all this more
easily and see the effect of sizeToFit at the same
time, I've written a little iPhone app called
ButtonInsetsPlayground. The
source is available on github.

Please forgive the made-by-a-programmer UI, this is purely for testing.
If you play around with this UI for a while, you should end up even
more confused than you were before. I seriously considered cracking
out IDA and diving in to the UIButton internals to
figure out what is going on, but I really want to finish this post.
(hint to the curious: the relevant selectors are -[UIButton
contentRectForBounds:], -[UIButton
titleRectForContentRect:] and -[UIButton
imageRectForContentRect:])
What you need to know is the following...
contentEdgeInsets
contentEdgeInsets is pretty intuitive and will behave
as you expect. You can easily add space around both the image and
text to pad things out nicely. Use positive values to inset the
content. The implementation of sizeThatFits: causes the
button to grow appropriately when we call sizeToFit:


UPDATE: I originally wrote about how it's possible to get pixel misaligned images with certain content insets. Naturally, this turned out to be my own fault.
imageEdgeInsets and titleEdgeInsets
The golden rule when it comes to these two insets is to add equal and opposite offsets to the left and right insets. So if you add 5pt to the left title inset, you must apply -5pt to the right. This means you are using these insets only to offset the image or text, not to resize them in any way.
If you do not follow this rule, the calculated layout rect for the title (or image) may become too small and you risk text truncation and other unexpected results:

This problem may not reveal itself until you have a string of the appropriate length, so if the text in your buttons is dynamic or localization-aware you need to be careful.
The top/bottom insets do not seem to have any major issues, but you should probably follow the same rule for these as well.
UIButton's mystical insets behaviour could be the topic
of an entire blog post of its own, but I think we have enough
information to continue on our way.
Finishing up
Back to our button.
We want to space out the elements a little better, and make
sure sizeToFit does the right thing.
First we'll add some left and right content insets:
// ...
UIEdgeInsets contentInsets =
    UIEdgeInsetsMake(0.0f, 15.0f, 0.0f, 15.0f);

[b setContentEdgeInsets:contentInsets];
[b sizeToFit];

Next we want to shift the text to the right, to create some space between it and the image. Following our golden rule, we add equal but opposite amounts to the left and right insets:
// ...
UIEdgeInsets titleInsets =
    UIEdgeInsetsMake(0.0f, 8.0f, 0.0f, -8.0f);

UIEdgeInsets contentInsets =
    UIEdgeInsetsMake(0.0f, 15.0f, 0.0f, 15.0f);

[b setTitleEdgeInsets:titleInsets];
[b setContentEdgeInsets:contentInsets];

[b sizeToFit];

Finally, we adjust the content insets again to add some extra space on the right for our inset text:
UIEdgeInsets titleInsets =
    UIEdgeInsetsMake(0.0f, 8.0f, 0.0f, -8.0f);

UIEdgeInsets contentInsets =
    UIEdgeInsetsMake(0.0f, 15.0f, 0.0f, 15.0f);

CGFloat extraWidthRequiredForTitle =
    titleInsets.left - titleInsets.right;

contentInsets.right += extraWidthRequiredForTitle;

[b setTitleEdgeInsets:titleInsets];
[b setContentEdgeInsets:contentInsets];

[b sizeToFit];
And at long last, we're finished. We can set arbitrarily long titles
on the button, call sizeToFit, and we get correct
results.
I hope this has been useful. If you can provide further insight
into UIButton's layout behaviour, I'd love to hear from
you!
While I agree that in most cases you shouldn't be using sizeWithFont, there are one or two cases where it is necessary. Most notably when you want to create a multiline UILabel that behaves as a single line label would with adjustsSizeToFitWidth enabled.
ReplyDeleteIn this case, (as Im sure you would agree) you should create a subclass of UILabel and override sizeThatFits: to encapsulate this logic.
I haven't been able to get a label with subscript to show up correctly in a UIButton, the button of the text is cut off. I've tried using sizeWithFont and sizeToFit, but no help so far. If you have any suggestion, I would greatly appreciate it.
ReplyDeleteHere's the subscript code I'm adding to the button
[btn setTitle:@"\u2080" forState:UIControlStateNormal];
I had the same problem. I change the UIButton font from SystemFont to Arial. Hope this helps.
DeleteI agree that calculating the required size of a view should be part of the view class and not be done by another class. However, sometimes you don't even have an instance of the view class because you need to know the required size before the view has been created. E.g. for a UITableView with dynamic row heights (depending on the row content) you have to provide the necessary height of each row in advance in tableView:heightForRowAtIndexPath:. I don't think that creating a view just to calculate the height of each row is good practice.
ReplyDeleteAnother issue is that on iOS < 6, sizeToFit and sizeThatFits: both ignore numberOfLines set on the label, leading to a super-wide one-line label :/
ReplyDeleteGreat guide (learned it the hard way). What would you do for localization when the string length varies from one language to the other?
ReplyDeleteIncredible article! I've wasted so much time wondering why my labels are not resized properly!.. Thank you for help!
ReplyDeletenice...
ReplyDeleteBerating people for not using methods that "have been around forever," without pointing out that until recently (iOS6) these methods were COMPLETELY BROKEN, is just dumb. Do your research before you start picking on people for using the methods that actually work. (And yes, I have clients that still need iOS5 compatibility.)
ReplyDeleteI had no idea I was using insets wrong until I got unexpected behavior. This helped a lot; thanks!
ReplyDeleteAmazing article.
ReplyDeleteThanks for sharing this.
Thanks a lot for this!
ReplyDeleteThis is awesome. Thank you.
ReplyDeleteSeriously, I've been doing this for years and I now I finally get button insets -- so massively useful -- I owe you a tall beverage of your choosing!
ReplyDeleteThanks you save my time.
ReplyDeleteJust great !! I liked this a lot in particular ...
ReplyDelete< It pains me to see people writing useless (and often times incorrect) categories on UILabel for something as standard as this. >
Excellent post. It's so clear after reading this.
ReplyDeleteClick this weblink now system health sms tracker to find information on phone tracking
ReplyDeleteI was using the same technique you have shared above as a sample. And thanks for your tips. Quite useful for my digitizing project. Thanks
ReplyDeleteI keep on reading your blog post. This was still amazing. Thanks a lot for sharing this unique informative post with us. Really enjoyed by reading your blog post.
ReplyDeleteEmbroidery Digitizing
Excellent post. It's so clear after reading this.
ReplyDeleteregards : best embroidery digitizing service
Mohegan Sun Arena, Uncasville CT 06382
ReplyDeleteWe are excited to welcome you to 꽁 머니 사이트 Mohegan Sun air jordan 18 retro toro mens sneakers outlet Arena. of all places you air jordan 18 retro toro mens sneakers from us can experience your real air jordan 18 stockx favorite sporting event in Connecticut. air jordan 18 retro yellow my site